Introduction
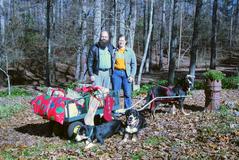 We are owned by three Greater Swiss Mountain Dogs. The
Greater Swiss Mountain Dog was bred as a
general-purpose farm dog, but one of their traditional tasks has been
hauling carts full of milk jugs. They can be thought of as "the poor
man's horse," although they make for peculiarly snuggly horses. They're
relatives of the St. Bernard, the Rottweiler, and particularly the
Bernese Mountain Dog: a Swissy is a slightly-larger short-haired Berner,
or, as we prefer to think of it, Berners are "Hippie Swissies."
Drafting with Dogs
Canine drafting has a fairly large following in the Newfoundland, Rottweiler, Swissy, and Bernese Mountain Dog worlds: http://www.canadasguidetodogs.com/clubs/draftdog.htm is a pretty good place to start looking if you're interested. There's also a Yahoo Groups list, CARTING-L, that you could join.You will need a strong, reasonably large dog that likes to work. If you want to build a cart like the one in this article, you'll need a pair of them, although you could, if you really wanted, build a scaled-down tandem cart for your Chinese Cresteds. If you live in a colder climate, you might want to investigate sledding, and conversely, your local sled dog club may also put on carting events when the weather is warmer, and it's quite likely to contain people who know about drafting.
Two of our Swissies—Golem and Ursa—already know how to draft, and although we have two carts (technically, a cart and a wagon: wagons have four weels, while carts have two), both of them are designed to be pulled by a single dog. Since we've got two carting dogs, we wanted to build a cart that both of them could pull at once.
Tandem Cart Design
 The basic design of the cart is that it will have two wheels on
independent axles (thus no need for a differential), two hooks in the
front (one for each dog to pull), and four shafts which guide the dogs
and have brakes affixed to them so the dogs can slow the cart simply by
slowing down and letting the brakes press on harness loops near their
shoulders.
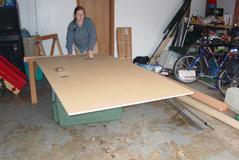
Capacity was much more important than speed to us, so it didn't matter how much the cart weighed; we were unlikely to build an empty cart too heavy for the Swissies to pull. Since our existing two-wheeled cart was about sixteen inches wide, we decided to make this one 32 inches wide. We decided that four feet would be about the right length. After having built a MAME cabinet last year, we had become fans of MDF—medium-density fibreboard—and we decided to make the deck out of 5/8" MDF.
MDF comes in 49"x97" sheets, so we bought one and cut a 32"x49" deck, and used the rest, balanced on a spare dog crate, as our work table for the rest of the project.(see Sidebar: Tools and Sidebar: Bill of Materials)
Framing the Deck
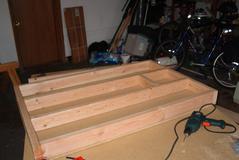 First we built a frame of 2x4 studs underneath the deck (since these
will not be visible on the finished cart, construction-grade is fine),
with two front-to-back stringers and a crossbar to anchor the back of
the larger conduit holding the shafts. The 2x4s
were nailed to each other and screwed to the MDF. All screws in this
design are countersunk. (see Sidebar:
Countersinking)
 Having built the deck, we then faced it with select-grade 1x8 lumber (we
chose a higher grade lumber so it would look nice when painted). We
decided to make the bottom of the lumber even with the bottom of the
2x4s, so 3-3/8" of the lumber would extend above the deck. We unwisely
chose to mitre the corners: this is a lot of work for not much result,
and we recommend against it, unless you have a big mitre saw.
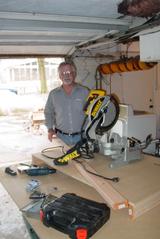
Fortunately for us, our neighbor Michael lent us his compound mitre saw,
which made cutting the mitres very easy. We screwed the
facing boards to the deck assembly, and then screwed the hooks for the
dogs to pull into the front end, through the facing board into the 2x4s.
Placing the Wheels
We additionally used sections of 2x8s to create raised axle mounts. These are not present in the final cart, because it turned out that they dropped the ground clearance of the cart so low that it was impossible to traverse even the slightest bumps. Don't bother with these, even though they are visible in the pictures. It turns out with this design that putting the axle about two inches forward of the center would balance it when both the shafts and spoiler are in place. Our cart is just slightly front-heavy, but not enough to make a difference, since you can easily adjust the load to compensate. The height of the axle above the deck ended up being as low as we could lay the electric drill down inside the cart and drill axle holes out through the sides. This gave us about seven inches of ground clearance; that is enough for carting on the street, but you wouldn't want to use this cart in rough terrain.A better design would actually have been to put the axles through the framing 2x4s as well, but this would have required longer axles than came with the wheels. I think 5/16" threaded rod would work fine; we may eventually move to this design, as it would increase both stability and ground clearance.
The wheels are standard 26" bicycle wheels; because we didn't care about the weight, we went with steel wheels at $20 each; with tires and tubes and tube liners, they ended up being about $70 for the set and were therefore the most expensive single component. You could cut this cost substantially by buying a used bike and throwing away everything but the wheels, of course.
Fastening the Shafts
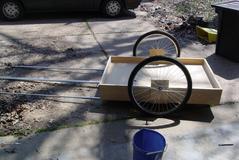 The next phase was to attach the shafts that the dogs would pull
between. The shafts actually function as brakes; the motive force is
provided by the rings at the back of the dog harness pulling on the two
hooks screwed into the front of the cart. We used 3/4" conduit for the
parts of the shafts attached to the carts—we simply used long screws to
attach them to the framing 2x4s—and used 1/2" conduit for the
detachable part of the shafts. We cut these with a conduit cutter and
filed the burrs off the ends. Then we carefully drilled 17/64" holes
through the assembled shafts and held them together with 1/4" cotter pins.
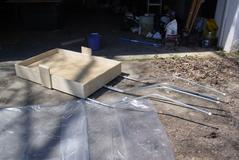 The shafts were then bent into shape with a pipe bender. This was a lot
trickier than it sounds, and we never did find a good way to get them
all very straight. Thankfully, our dogs aren't particularly
precision-crafted either, and good enough was, indeed, good enough.
Plain old chair leg tips cushion the
end of the shafts. We bent our shafts so that they'd be at about 16" off
the ground when the cart was level; you should adjust this to fit your
own dogs' height, of course.
You will want brakes on the shafts; we used plain old hose clamps. These go behind the loops on the dogs' harnesses, so when they slow down, the shafts stop at the loops, so the dogs don't get run over by the cart as they slow.
Pimping the Ride
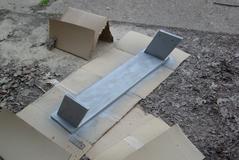 At this point, you certainly could drill holes for the axles in the
sides of the cart, mount the wheels, and begin carting. We decided, in
honor of Make's automotive issue, to pimp our ride a bit. Thus, we
constructed a spoiler out of scrap MDF and fashioned two
oversized exhaust pipes from dryer vents tacked to a hardboard base.
 Then we sprayed the contraption with endless coats of metallic-flake
black (all projects take five times as much paint as they should),
mounted the wheels (5/16" holes for the axles and large washers to
spread out the pressure).
Final detailing included a vanity license plate reading "DOG CART"
(designed and purchased online at signsbyyou.com), which we outlined in
purple EL wire to make it look hip. Finally we added a Type-R decal 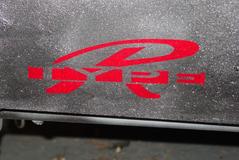 , which makes the cart 25%
faster. We plan to carpet the deck, but we haven't done that yet.
The Completed Cart
In order to get the brakes on the level part of the shafts, we added 2 feet of chain with carabiners to clip to the dogs' harnesses; this gives us some flexibility in how far forward the dogs are when they're pulling.
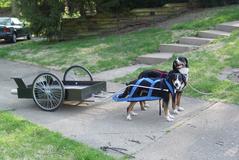
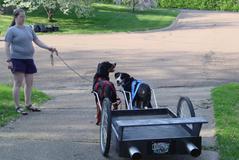 Here's the finished product, with the dogs saddled up and ready to go.
Golem is the big dog and Ursa is the small one. Vinnie, our third
Swissy, does not yet know how to cart.
Conclusion
The cart works fine, but the dogs need some more training: in particular, Golem freaks out when Ursa starts pulling and the cart rides up on him. His response is to dig in his feet. This means that Ursa does a huge amount of work, and that he needs a lot of cajoling to actually start pulling. Although they both pull well individually, Golem is confused about how to do it as part of a team. Ursa has no such issues, although she does get annoyed that Golem is slowing her down.Nevertheless, we did return Michael's saw to him today in the cart, which involved several hundred yards of hilly drafting carrying a pretty heavy load (although Michael and Dee are neighbors of ours, their back yard backs onto our side yard, and they are a fair distance away by road). The dogs are easily able to pull the cart loaded with a heavy saw, and I have high hopes of someday being able to ride my canine chariot through the neighborhood.
Tools
- Electric drill and wide variety of bits
- Electric screwdriver
- Circular Saw
- Hammer
- Conduit Cutter
- Flat file
- Pipe Bender
- Socket Set
- Pliers
- Optional: Compound mitre saw (don't try mitred corners without it!)
Bill of Materials
Required
- 1 sheet 5/8" MDF
- 3 96" 2x4 studs
- 2 96" select 1x8 hardwood boards
- 2 26" bicycle wheels, tubes, tube liners, and tires
- 2 10' 1/2" conduits
- 1 10' 3/4" conduit
- Lots of 1-1/2" #8 wood screws
- Some 4" framing nails
- 2 cans of primer
- 6 cans of spray paint (we used black metal-flake)
- 4 5/16" washers
- 4 1/2" rubber chair leg tips
- 4 1/2" hose clamps
- 4 cotter pins
- 2 screw hooks, 3" x 1/4"
- 2 2-foot lengths of 3/4" chain
- 2 spring-loaded carabiners
Optional
- 24"x48" sheet of hardboard
- A couple dozen 5/8" wire nails
- A couple dozen 5/8" wood screws
- Masking tape
- 2 dryer vents
- EL wire, battery, and driver
- 32" x 49" industrial carpeting
- Type-R Decal
- vanity license plate
Countersinking
 Countersinking is easy: after drilling the pilot hole for your screw,
put a 5/16" bit in and drill just enough for the bit to bite, leaving
you with a 1/4"-3/8" hole at the top of your pilot hole, big enough for
the screw head to sink into so that it's level with or recessed with the
surface of the piece you're screwing on.
 You could also just buy a countersinking bit; they cost $10-$15.